Who doesn’t love a flawless face? Well we all do!
Skin Care is important but what compliments it more is – the right makeup look. Carefully highlighted cheekbones, skillfully achieved contour lines, this is art. But the most important factor here is – base. If your base isn’t flawless, your makeup will eventually start to look dull and cakey. Do we want that? Never.
A perfect base starts with foundation. If your foundation isn’t in place, it is definitely going to ruin your overall look. And therefore we’ve come up with our best tips that will help your foundation, breathe and your makeup, glow!
Take notes!
- Get your primer
The texture of our skin on various parts of our faces varies in hydration. Unfortunately, as the base goes on, some of these differences are emphasised, which takes us to the point of putting on a primer before the base.
Primers form a barrier between the skin and the base, softening the texture and filling large pores so that the foundation can easily smooth down. Plus, to help balance out the texture as well, several hydrating primers hydrate dry skin patches.
If your skin is oily, especially around the T-zone area, you can use an oil-based primer. Note, you don’t have to use the whole face with one primer. With the proper primer, target particular issues and your base will look clean.
- Blend it baby!
Blend. Blend. Blend.
Once you are done with the application, it is IMPORTANT that you blend it nicely. Let this step take some extra time. Use this as your mantra to a flawless base.
The best approach would be to use a damp beauty blender. Don’t rub your foundation on to your face, follow a dabbing motion and push the foundation into your skin. It’ll take time but it’ll be worth the shot.
- Is the shade right for your skin tone?
A wrong foundation shade will totally ruin your makeup look, because if it is too orange, it will make your skin look grey. It is also important to ensure that the base is the best fit for your skin tone.
“The best way to test a foundation shade is in natural daylight, swatch it from the top of your cheek to your jawline to ensure it’s the perfect tone throughout the face”, says Amy Conway, BB Pro Artist at Bobbi Brown.
- Less is more
Avoid adding too many layers of foundation. Most of us assume that applying foundation all over the face will give a better look, but this is not necessarily the case.
“For me, foundation should only be applied where needed. It is used to even out the skin tone and applied directly to the areas of concern (redness, pigmentation, shadows and blemishes) then blended out across the good skin,” says Florrie White, makeup artist who has worked on the faces of celebrities such as Emilia Clarke and Rosie Huntington-Whiteley.
- Prep prep prep
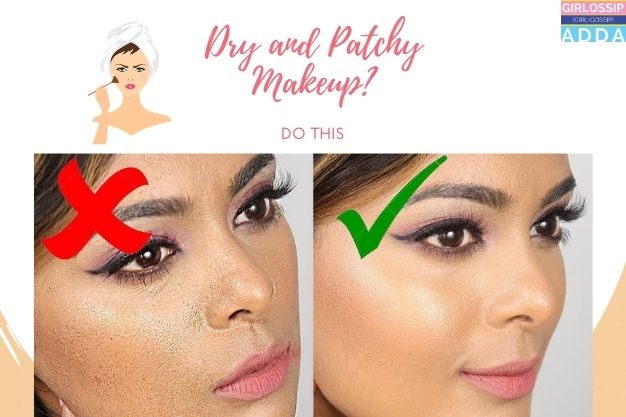
Prepare your skin nicely before applying any makeup product on it. Making sure your skin is adequately prepared will help you achieve a perfect finish easily. The foundation will stick to the skin and settle into patches if your skin is dry.
The key here is to be patient. “I apply any serums, moisturiser and eye creams before applying foundation and let them sit for a minute – which is a good time to wash your sponge! You need to let your skincare product rest and sink into the skin first. If you don’t, too much product will cause product pilling, which is when the product rolls into little balls,” says Liz.
It’s necessary to make sure you prep your skin every day. “Always clean every remnant of yesterday’s makeup and pollution the night before, moisturised and any concerns treated. Foundation blends much smoothly onto well prepped skin.” recommends Florrie.
She further adds, “If you are retouching your foundation at the end of the day, a light spritz of a hydrating skin spray first will prep and pep up the skin surface so the fresh application of foundation will blend easily in; avoiding a thick, cakey base.”
- Set your makeup
Baking is important.
If you want your makeup to last all day, it is important that you bake it. “Normally I use a powder puff and press a loose powder into the T-zone as this is the most oily area.” Liz says.
Florrie says “you can choose a foundation which also has properties which work with your skin concerns albeit oily, dry, combination and/or acne”, meaning you can set your base accordingly.
“I prefer to use blotting paper to remove excess dewiness while avoiding adding another layer of a product to your skin.” She adds.
- Pick the right tools
“As a makeup artist I turn to sponges to press off any excess after for more of a matte finish. But as a top tip, whether you prefer brushes or sponges, always press your foundation in with your fingertips after application. Nothing imitates skin more than your own hands, so by pressing the face gently this will melt the makeup into the face for an even more natural look.” says Amy, a famous make-up artist.
- Clean your brushes
Forgetting to wash your makeup tools could cause a spread of bacteria, resulting in spots and a dull complexion. After every use, both Liz and Florrie recommend washing the brushes and beauty sponges.
“Brushes and sponges will harbour bacteria so important to keep clean. Forget special potions and cleaners, I use an antibacterial washing up liquid as it will remove the oil from the foundation easily. Foundation brushes should be synthetic so washing these in washing up liquid is fine. For real hair brushes I treat them like hair and shampoo and condition,” says Liz.
Bonus- One quick tip:
“Cooler tones often tan a pink/cinnamon shade, and should opt for cooler foundation shades, including cinnamon tone bronzers and even grey tones in the eyeshadows. Warmer tones rarely burn, and should opt for yellow undertone foundation with golden shades in bronzer and taupe tone shadows.”
We hope these tips will help you achieve that glamorous and flawless makeup look that doesn’t cake. So get your makeup bag ready and begin!